Friday, August 7, 2015

Jmeter publisher subscriber for ActiveMQ AMQP protocol

Recently I was assigned task to evaluate performance of ActiveMQ AMQP protocol [1]. ActiveMQ supports AMQP v1.0 specification and it is completely different from previous versions of AMQP specification (0.10, 0.9.1, 0.9 ..). AMQP v1.0 support added to ActiveMQ  by Apache Qpid Proton. Let's see how we can connected to ActiveMQ broker with Jmeter.

Start ActiveMQ broker. Please note that AMQP supports added to ActiveMQ version 5.8 onward. I had apache-activemq-5.10.0 distribution.

Go to bin folder and start broker by executing activemq shell script.
~/apache-activemq-5.10.0/bin$ ./activemq start

This would start broker in background and you can see logs by tail log file.
~/apache-activemq-5.10.0/data$ tailf activemq.log

AMQP listening in 5672 port by default. You can change default AMQP port by editing AMQP transportConnector in activemq.xml.
<transportConnector name="amqp" uri="amqp://0.0.0.0:5672?maximumConnections=1000&amp;wireFormat.maxFrameSize=104857600"/>

Now we'll go through how to create Jmeter script. I am using apache-jmeter-2.7. You need to copy following jar files to lib folder of Jmeter. 

activemq-all-5.10.0.jar
geronimo-jms_1.1_spec-1.1.1.jar
qpid-amqp-1-0-client-0.26.jar
qpid-amqp-1-0-client-jms-0.26.jar
qpid-amqp-1-0-common-0.26.jar

Above libraries would provide necessary classes to execute test plan in Jmeter.

Next we need to create a property file which contain jndi names to register AMQP connection factories, queue/topic names. I created file called qpid.properties in apache-jmeter-2.7 folder and added following entries.
# register some connection factories
# connectionfactory.[jndiname] = [ConnectionURL - amqp://username:password@host:port]
connectionfactory.QueueConnectionFactory = amqp://admin:password@localhost:5672
connectionfactory.TopicConnectionFactory = amqp://admin:password@localhost:5672

# register some queues in JNDI using the form
# queue.[jndiName] = [physicalName]
queue.myQueue = myQueue

# register some topics in JNDI using the form
# topic.[jndiName] = [physicalName]
topic.myTopic = myTopic

If you have already worked with previous version of AMQP protocol, you may realize that broker url is completely different. There are no Virtual-hosts, Exchanges, Bindings according to AMQP v1.0. Therefore broker url also changed according to that. 

Now start Jmeter by executing jmeter.sh in bin folder.
~/apache-jmeter-2.7/bin$ ./jmeter.sh

Let's create test plan for subscriber. R-click Test Plan -> Add -> Thread (Users) -> Thread Group. I set name to Thread Group as Subscriber and Loop Count to 100.

amqp subscriber thread group

R-click Thread Group (Subscriber) -> Add -> Sampler -> JMS Subscriber. Set following properties.
Initial Context Factory - org.apache.qpid.amqp_1_0.jms.jndi.PropertiesFileInitialContextFactory
Provider URL - /home/indika/demo-zone/apache-jmeter-2.7/qpid.properties
Connection Factory - QueueConnectionFactory
Destination - myQueue

Make sure you provide same jndiName specified above for Connection Factory and Destination.

amqp subscriber

Let's add Summary Report to view result. R-click Thread Group (Subscriber) -> Add -> Listener -> Summary Report

amqp subscriber summary report

Now we'll create test plan for publisher. Start another instance of Jmeter by executing jmeter.sh in bin folder.
~/apache-jmeter-2.7/bin$ ./jmeter.sh

R-click Test Plan -> Add -> Thread (Users) -> Thread Group. I set name to Thread Group as Publisher and Loop Count to 100.

amqp publisher thread group

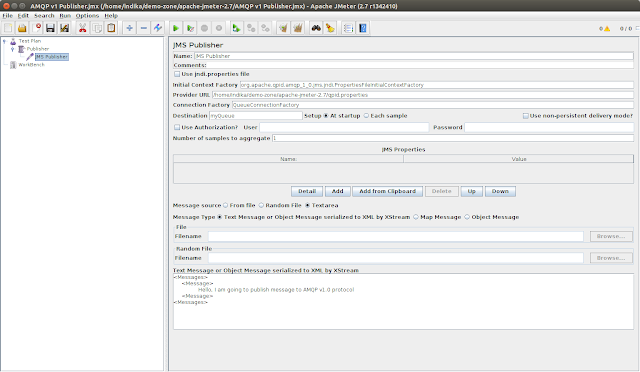
R-click Thread Group (Publisher) -> Add -> Sampler -> JMS Publisher. Set following properties.
Initial Context Factory - org.apache.qpid.amqp_1_0.jms.jndi.PropertiesFileInitialContextFactory
Provider URL - /home/indika/demo-zone/apache-jmeter-2.7/qpid.properties
Connection Factory - QueueConnectionFactory
Destination - myQueue

Set any message to publish in given text area.

amqp publisher


Let's add Summary Report to view result. R-click Thread Group (Publisher) -> Add -> Listener -> Summary Report

amqp publisher summary report

Now you can execute both test plans. First start subscriber test plan by pressing start button in Jmeter. Next start publisher test plan. You could see the result of both in summary report.


[1] http://activemq.apache.org/amqp.html
[2] http://qpid.apache.org/proton

Saturday, May 2, 2015

Shared Topic Subscription in WSO2 Message Broker 3.0.0

This post mainly focus on how configure shared topic subscription in WSO2 MB 3.0.0 and discuss use case with WSO2 ESB cluster as JMS consumer and publisher.

Enable shared topic subscription

  1. Extract wso2mb-3.0.0-SNAPSHOT zip archive
  2. Configure it with preferable message store (ex: MySQL, MSSQL, Oracle, Cassandra) - By default it’s distribute with H2. You can play with default message store. But we do not recommend it for clustering and production setup. [1]
  3. Open wso2mb-3.0.0/repository/conf/broker.xml
  4. Set <allowSharedTopicSubscriptions> to true under <amqp enabled="true"> in <transports>.

Now you’ll be able to add multiple durable subscription with same subscription id. Please refer how to write JMS client samples [2].

How shared topic subscription works?

mb_3_0_0_shared_subscription.png


  1. Subscriber 1 create durable subscription to myDurableTopic with id : subId-x
  2. Subscriber 2 create durable subscription to myDurableTopic with id : subId-x
  3. Subscriber 3 create durable subscription to myDurableTopic with id : subid-y
  4. Publisher send messages to myDurableTopic
  5. Message delivery as below among durable subscribers:
    1. Subscriber 1 and Subscriber 2 with id : subId-x get copy of each message in round robin order
    2. Subscriber 3 with id : subId-y get each copy of each message

Rationale of message delivery of shared subscription is, If there are multiple subscribers with same subscription id for particular durable topic, then message delivered among them in round robin order.

Use Case - WSO2 MB shared subscription with WSO2 ESB cluster

mb_3_0_0_shared_subscription_use_case_ESB.png


Setting up WSO2 MB 3.0.0

Default H2 based message store use as it is.
Shared subscription enabled in wso2mb-3.0.0-SNAPSHOT/repository/conf/broker.xml as below

        <amqp enabled="true">
            <!-- most of the AMQP configurations reside in qpid-config.xml since we inherit the Qpid
            messaging model during AMQP.-->
            <port>5672</port>
            <sslPort>8672</sslPort>
            <sendExpiredMessagesToDLC>false</sendExpiredMessagesToDLC>
            <maximumRedeliveryAttempts>10</maximumRedeliveryAttempts>
            <allowSharedTopicSubscriptions>true</allowSharedTopicSubscriptions>
        </amqp>

Go to wso2mb-3.0.0-SNAPSHOT/bin and start broker wso2server.sh start
You can tail logs in wso2mb-3.0.0-SNAPSHOT/repository/logs/wso2carbon.log

Setting up backend server - SimpleStockQuoteService

Go to wso2esb-4.8.1/samples/axis2Server/src/SimpleStockQuoteService
Run ant command and it will build SimpleStockQuoteService axis2 service
Start SimpleStockQuoteService:
  • Go to wso2esb-4.8.1/samples/axis2Server/ and run ./axis2server.sh

Setting up WSO2 ESB 4.8.1

This guide shows you to setting up one ESB node. Please refer [3] to configure ESB cluster.
Offset changed to 1 in wso2esb-4.8.1/repository/conf/carbon.xml

        <!-- Ports offset. This entry will set the value of the ports defined below to
         the define value + Offset.
         e.g. Offset=2 and HTTPS port=9443 will set the effective HTTPS port to 9445
         -->
        <Offset>1</Offset>

JMS transport enabled in wso2esb-4.8.1/repository/conf/axis2/axis2.xml as below

    <!--Uncomment this and configure as appropriate for JMS transport support with WSO2 MB 2.x.x -->
    <transportReceiver name="jms" class="org.apache.axis2.transport.jms.JMSListener">
        <parameter name="myTopicConnectionFactory" locked="false">
           <parameter name="java.naming.factory.initial" locked="false">org.wso2.andes.jndi.PropertiesFileInitialContextFactory</parameter>
            <parameter name="java.naming.provider.url" locked="false">repository/conf/jndi.properties</parameter>
            <parameter name="transport.jms.ConnectionFactoryJNDIName" locked="false">TopicConnectionFactory</parameter>
            <parameter name="transport.jms.ConnectionFactoryType" locked="false">topic</parameter>
        </parameter>

        <parameter name="myQueueConnectionFactory" locked="false">
            <parameter name="java.naming.factory.initial" locked="false">org.wso2.andes.jndi.PropertiesFileInitialContextFactory</parameter>
            <parameter name="java.naming.provider.url" locked="false">repository/conf/jndi.properties</parameter>
            <parameter name="transport.jms.ConnectionFactoryJNDIName" locked="false">QueueConnectionFactory</parameter>
           <parameter name="transport.jms.ConnectionFactoryType" locked="false">queue</parameter>
        </parameter>

        <parameter name="default" locked="false">
            <parameter name="java.naming.factory.initial" locked="false">org.wso2.andes.jndi.PropertiesFileInitialContextFactory</parameter>
            <parameter name="java.naming.provider.url" locked="false">repository/conf/jndi.properties</parameter>
            <parameter name="transport.jms.ConnectionFactoryJNDIName" locked="false">QueueConnectionFactory</parameter>
            <parameter name="transport.jms.ConnectionFactoryType" locked="false">queue</parameter>
        </parameter>
    </transportReceiver>

   <!-- uncomment this and configure to use connection pools for sending messages-->
     <transportSender name="jms" class="org.apache.axis2.transport.jms.JMSSender"/>

JNDI.properties configured to connection lookup in wso2esb-4.8.1/repository/conf/jndi.properties

# register some connection factories
# connectionfactory.[jndiname] = [ConnectionURL]
connectionfactory.QueueConnectionFactory = amqp://admin:admin@clientID/carbon?brokerlist='tcp://localhost:5672'
connectionfactory.TopicConnectionFactory = amqp://admin:admin@clientID/carbon?brokerlist='tcp://localhost:5672'

Copy below client libraries from wso2mb-3.0.0-SNAPSHOT/client-lib/ to wso2esb-4.8.1/repository/components/lib

andes-client-3.0.0-SNAPSHOT.jar
geronimo-jms_1.1_spec-1.1.0.wso2v1.jar

Go to wso2esb-4.8.1/bin and start service bus wso2server.sh start
You can tail logs in wso2esb-4.8.1/repository/logs/wso2carbon.log


JMS consumer and publisher proxies

Login to ESB management console and create proxy services as below:

StockDataPersistProxy

<proxy xmlns="http://ws.apache.org/ns/synapse"
      name="StockDataPersistProxy"
      transports="http"
      statistics="disable"
      trace="disable"
      startOnLoad="true">
  <target>
     <inSequence>
        <property name="OUT_ONLY" value="true"/>
        <property name="FORCE_SC_ACCEPTED" value="true" scope="axis2"/>
        <log level="custom">
           <property name="STATE" value="Stock data publishing..."/>
        </log>
        <send>
           <endpoint>
              <address uri="jms:/stockDataTopic?&amp;java.naming.factory.initial=org.wso2.andes.jndi.PropertiesFileInitialContextFactory&amp;java.naming.provider.url=repository/conf/jndi.properties&amp;transport.jms.ConnectionFactoryJNDIName=TopicConnectionFactory&amp;transport.jms.DestinationType=topic"/>
           </endpoint>
        </send>
     </inSequence>
     <outSequence/>
  </target>
  <description/>
</proxy>


StockDataDeliveryProxy

<?xml version="1.0" encoding="UTF-8"?>
<proxy xmlns="http://ws.apache.org/ns/synapse"
      name="StockDataDeliveryProxy"
      transports="jms"
      statistics="disable"
      trace="disable"
      startOnLoad="true">
  <target>
     <inSequence>
        <property name="OUT_ONLY" value="true"/>
        <log level="custom">
           <property name="STATE" value="Stock data delivering..."/>
        </log>
        <send>
           <endpoint>
              <address uri="http://localhost:9000/services/SimpleStockQuoteService"/>
           </endpoint>
        </send>
     </inSequence>
     <outSequence>
        <send/>
     </outSequence>
  </target>
  <parameter name="transport.jms.ContentType">
     <rules>
        <jmsProperty>contentType</jmsProperty>
        <default>text/xml</default>
     </rules>
  </parameter>
  <parameter name="transport.jms.ConnectionFactory">myTopicConnectionFactory</parameter>
  <parameter name="transport.jms.DestinationType">topic</parameter>
  <parameter name="transport.jms.SubscriptionDurable">true</parameter>
  <parameter name="transport.jms.Destination">stockDataTopic</parameter>
  <parameter name="transport.jms.DurableSubscriberName">subId-x</parameter>
  <parameter name="transport.jms.CacheLevel">consumer</parameter>
  <parameter name="transport.jms.DurableSubscriberClientID">subId-x</parameter>
  <description/>
</proxy>

Test the setup

SoapUI used to call stockDataPersistProxy and send request to SimpleStockQuoteService

Open SoapUI and create New SOAP Project with WSDL URL of StockDataPersistProxy.
Call StockDataPersistProxy with below SOAP envelop and you can monitor logs in wso2esb console and axis2 servers.

<soapenv:Envelope xmlns:soapenv="http://schemas.xmlsoap.org/soap/envelope/" xmlns:ser="http://services.samples">
  <soapenv:Header/>
  <soapenv:Body>
     <ser:getSimpleQuote>
        <ser:symbol>IBM</ser:symbol>
     </ser:getSimpleQuote>
  </soapenv:Body>
</soapenv:Envelope>


Thursday, January 8, 2015

Where is your java distribution running on Ubuntu ?

There are couple of ways to getting Java running on Ubuntu. Some are extract the Java binary distribution and changing system files to thing get effected. Some are using apt-get install utility to Java distribution get running on Ubuntu. So in this blog post I am not going to discuss about how to get Java running on Ubuntu. 

You may actually not know where is Java distribution folder extracted and running, I mean which path if you installed it using apt-get utility. Even you may forget with the time being, specially like me ;-) if you extracted Java binary in a exact path that you want. I faced same situation and need to find out where is my Java distribution running. So I found the below command which exactly tell you the path.


readlink -f $(which java)

Monday, May 5, 2014

WSO2 Message Broker 2.2.0 cluster setup in a single machine

Topic might be bit wired because how come cluster configure in a single machine ? :) But this article will be much helpful if you really want to test the cluster setup when you don't have more than one machine. Let's look at new feature which is going to introduce with WSO2 Message Broker 2.2.0 and try out cluster setup.

WSO2 Message Broker - Carbon Profile

What is carbon profile?

WSO2 carbon platform has number of advance features. Multi-Profile support is one of it. You can specify in which profile your server needs to be started. If you have experience with Apache Maven profile, you may know that it build the project with given profile. So the relevant configuration setting will be applied in the build time according to the specified profile settings. But in the carbon, profile configuration will apply in the run time. Underlying mechanism is based on the OSGi. It specificies what are the bundles which needs to be started based on the profile. One product can be consisted with multiple profile which support different types of standalone operation. Visit following link to understand more implementation details about carbon multi profile.
https://docs.wso2.org/display/Carbon420/Multiple+Profiles

Why carbon profiles in WSO2 Message Broker?

WSO2 Message Broker works with Apache Cassandra and in clustering environment it use the Apache Zookeeper. By default Message Broker has these two artifacts as features. If you started Message Broker in default way, then it start with both of these artifacts. In the production environment it’s not a scalable and reliable approach to use Message Broker with Cassandra and Zookeeper itself. The recommended approach in production environment is to use the external Cassandra and Zookeeper nodes.

WSO2 Message Broker support external Cassandra and Zookeeper. The recommended versions are cassandra 1.3 and zookeeper 3.4.5 to setup the clustering. If you used some different version there might be other configuration issues which needs to be addressed when Message Broker in high concurrency. Generally there is no errors. The purpose of supporting carbon profiles in Message Broker is to avoid these types of issues. You can easily configure cluster of Message Broker with profiles because it 100% compliant with the recommendation.

WSO2 Message Broker version 2.2.0 onward support the multi-profile. It has two profiles namely cassandra and zookeeper. If you didn’t specify the profile at startup the default profile will be used. Only profile related features will be started and run when Message Broker starts with the profile. There won’t be any Message Broker related features started and run when you specify the profile. This will make the clear separation between the default startup and profile startup. 

Setup clustering environment:

3 WSO2 Message Broker 
1 WSO2 Message Broker as Cassandra profile
3 WSO2 Message Broker as Zookeeper profile

First of all we need to create 3 IP aliases in the machine. Use the following commands to do it.

sudo ifconfig eth0:1 192.168.0.10
sudo ifconfig eth0:2 192.168.0.11
sudo ifconfig eth0:3 192.168.0.12

You can check all the above IP aliases created successfully by just typing ifconfig command.

We need 7 Message Broker packs and I used following folder structure to copy them. Each Message Broker node configure with different port offset to avoid the port conflicts. Please follow below link if you don't know about port offset in carbon based server.
https://docs.wso2.org/display/MB210/Port+Offset+Configuration

Cluster
Type Server Offset
mb1 wso2mb-2.2.0 1
mb2 wso2mb-2.2.0 2
mb3 wso2mb-2.2.0 3
cs wso2mb-2.2.0 4
zk1 wso2mb-2.2.0 5
zk2 wso2mb-2.2.0 6
zk3 wso2mb-2.2.0 7

Zookeeper nodes configuration

Let's configure the Zookeeper nodes first. You have few configuration settings to be done before start the Message Broker in zookeeper profile.

Copy and paste the following settings to the wso2mb-2.2.0/repository/conf/etc/zoo.cfg in each Message Broker node which is going to be started as Zookeeper profile (zk1, zk2, zk3).

Please REMEMBER to CHANGE the clientPort in each Message Broker node as follows to avoid the port conflicts before you save the changes in zoo.cfg file.

in zk1 chnage to clientPort=2181
in zk2 change to clientPort=2182
in zk3 change to clientPort=2183

# The number of milliseconds of each tick
tickTime=2000

# the directory where the snapshot is stored.
# Choose appropriately for your environment
dataDir=repository/data/zookeeper

# the port at which the clients will connect
clientPort=2181

# mb related configuration to handle zookeeper startup
start_zk_server=true

# additional authentication plugin
authProvider.1=org.apache.zookeeper.server.auth.SASLAuthenticationProvider

# optional: if it is set to any value, 
# it will only allow non-authenticated clients to ping, create session, close session, or sasl-authenticate
#requireClientAuthScheme=sasl

# renew server-side ticket once an hour. 1000*60*60 = 3600000 milliseconds
jaasLoginRenew=3600000

# The number of ticks that the initial synchronization phase can take
initLimit=5

# The number of ticks that can pass between
# sending a request and getting an acknowledgement
syncLimit=2

# ZooKeeper server and its port no.
# ZooKeeper ensemble should know about every other machine in the ensemble
# specify server id by creating 'myid' file in the dataDir
# use hostname instead of IP address for convenient maintenance
server.1=192.168.0.10:2888:3888
server.2=192.168.0.11:2889:3889
server.3=192.168.0.12:2890:3890

Next we have to create a file call myid which is defining the id of the zookeeper server to identify it in the cluster environment.

Note that you have to create a folder call zookeeper inside the wso2mb-2.2.0/repository/data/
Then go to the wso2mb-2.2.0/repository/data/zookeeper
Create a file call myid and define id of the zookeeper server and save it. I defined the server id in the myid file as below according to the above scenario.

in zk1 myid file value define as 1
in zk2 myid file value define as 2
in zk3 myid file value define as 3

Now we done with the Zookeeper cluster configuration. Let's start the each Message Broker node as Zookeeper profile with below command.

cluster/zk1/wso2mb-2.2.0/bin$ ./wso2server.sh -Dprofile=zookeeper
cluster/zk2/wso2mb-2.2.0/bin$ ./wso2server.sh -Dprofile=zookeeper
cluster/zk3/wso2mb-2.2.0/bin$ ./wso2server.sh -Dprofile=zookeeper

You will see that few exception will throw when zk1 and zk2 start up complaining that remaining nodes in the zookeeper cluster are not connected. But those exception throwing will stop once all nodes started successfully.

Cassandra node configuration

Next we'll start the Cassandra node. You have nothing to configure, just start the it as below.

cluster/cs/wso2mb-2.2.0/bin$ ./wso2server.sh -Dprofile=cassandra

Broker nodes configuration

There are few settings to be done in the 3 broker nodes. First we have to enable the clustering in each broker node and enable the broker to use the external cassandra and external zookeeper. Change the below settings in each of the following files. Please note that given configuration is just the part which needs to be changed in the andes-config.xml

cluster/mb1/wso2mb-2.2.0/repository/conf/advanced/andes-config.xml
cluster/mb2/wso2mb-2.2.0/repository/conf/advanced/andes-config.xml
cluster/mb3/wso2mb-2.2.0/repository/conf/advanced/andes-config.xml

<clustering>

        <enabled>true</enabled>
        <!--To enable External Cassandra server ? true|false-->
        <externalCassandraServerRequired>true</externalCassandraServerRequired>
        <!--To enable External Zookeeper server ? true|false -->
        <externalZookeeperServerRequired>true</externalZookeeperServerRequired>
        <GlobalQueueCount>10</GlobalQueueCount>
        <coordination>
            <!-- Apache Zookeeper Address -->
            <ZooKeeperConnection>192.168.0.10:2181,192.168.0.11:2182,192.168.0.12:2183</ZooKeeperConnection>

Finally we have to configure the cassandra node virtual host setting in the below locations.

cluster/mb1/wso2mb-2.2.0/repository/conf/advanced/andes-virtualhosts.xml
cluster/mb2/wso2mb-2.2.0/repository/conf/advanced/andes-virtualhosts.xml
cluster/mb3/wso2mb-2.2.0/repository/conf/advanced/andes-virtualhosts.xml

<store>
                <class>org.wso2.andes.server.store.CassandraMessageStore</class>
                <username>admin</username>
                <password>admin</password>
                <cluster>ClusterOne</cluster>
                <idGenerator>org.wso2.andes.server.cluster.coordination.TimeStampBasedMessageIdGenerator</idGenerator>
                <connectionString>localhost:9164</connectionString>

We are done with all broker nodes configurations. Let's start each Message Broker node as below.

cluster/mb1/wso2mb-2.2.0/bin$ ./wso2server.sh
cluster/mb2/wso2mb-2.2.0/bin$ ./wso2server.sh
cluster/mb3/wso2mb-2.2.0/bin$ ./wso2server.sh

Now our Message Broker cluster up and running. You can test any scenario as you want in this cluster setup.

You can visit following link to get more information about the WSO2 Message Broker clustering pattern.


Wednesday, February 26, 2014

WSO2 ESB Performance Round 7.5

The latest result of the WSO2 ESB performance round is released. It reveals that WSO2 ESB 4.8.1 is the world's most fastest ESB. Results compares with the other open source ESBs. You can go into more details about Performance Round 7.5  in the following article.

WSO2 ESB Performance Round 7.5

Here are some statistics about Performance Round 7.5


Saturday, January 11, 2014

Test your Axis2 service without deploy in server

Hi All,

This is a topic that I tried out during last two days and finally I was able to find a proper mechanism to do it. During these days I'm under a training and I assigned some exercise to complete. So the one exercise is to study the Axis2 and write service and client. I wrote a service and generate the .aar by maven plugin axis2-aar-maven-plugin and deploy it in a WSO2 application server. It support to deploy the .aar file.

/**
 * Order model class
 */
public class Order {

    private Integer orderNumber;
    private String customerName;
    private Date orderDate;

    public Integer getOrderNumber() {
        return orderNumber;
    }

    public void setOrderNumber(Integer orderNumber) {
        this.orderNumber = orderNumber;
    }

    public String getCustomerName() {
        return customerName;
    }

    public void setCustomerName(String customerName) {
        this.customerName = customerName;
    }

    public Date getOrderDate() {
        return orderDate;
    }

    public void setOrderDate(Date orderDate) {
        this.orderDate = orderDate;
    }
}

/**
 * OrderService used to handle order process
 */
public interface OrderService {

    /**
     * Add order to process
     *
     * @param order {@link org.wso2.axis.model.Order} object which contains order details
     * @return message to the user
     */
    String addOrder(Order order);

    /**
     * Get order details by order number
     *
     * @param orderNumber order number to get order details
     * @return {@link org.wso2.axis.model.Order} object which contains order details
     */
    Order getOrderByOrderNumber(Integer orderNumber);

    /**
     * Get all oder details
     *
     * @return List of {@link org.wso2.axis.model.Order} objects which contains order details
     */
    List<Order> getAllOderDetails();
}

/**
 * Implementation of {@link org.wso2.axis.service.OrderService}
 */
public class OrderServiceImpl implements OrderService {

    private static List<Order> orderList = new ArrayList<Order>();

    /**
     * Add order to process
     *
     * @param order {@link org.wso2.axis.model.Order} object which contains order details
     * @return message to the user
     */
    @Override
    public String addOrder(Order order) {
        String message = null;
        if(OrderValidator.validateOrder(order)){
            orderList.add(order);
            message = "Order added successfully. ["+order.getOrderNumber()+", "+order.getOrderDate()+", "+order.getCustomerName()+"]";
        } else {
            message = "Order not added. Please check your data.";
        }
        return message;
    }

    /**
     * Get order details by order number
     *
     * @param orderNumber order number to get order details
     * @return {@link org.wso2.axis.model.Order} object which contains order details
     */
    @Override
    public Order getOrderByOrderNumber(Integer orderNumber) {
        Order orderFound = null;
        if(orderNumber != null){
            for (Order order : orderList) {
                if(order.getOrderNumber().equals(orderNumber)){
                    orderFound = order;
                }
            }
        }
        return orderFound;
    }

    /**
     * Get all oder details
     *
     * @return List of {@link org.wso2.axis.model.Order} objects which contains order details
     */
    @Override
    public List<Order> getAllOderDetails() {
        return orderList;
    }
}

/**
 * Validate order object
 */
public class OrderValidator {

 public static boolean validateOrder(Order order) {
  boolean validate = false;
  if (order != null) {
   if (order.getOrderNumber() != null && order.getCustomerName() != null &&
       order.getOrderDate() != null) {
    validate = true;
   }
  }
  return validate;
 }
}

<?xml version="1.0" encoding="UTF-8"?>
<service name="OrderService" targetNamespace="http://service.axis.wso2.org">

    <schema schemaNamespace="http://service.axis.wso2.org"/>

    <description>Order web service</description>

    <!--compulsory parameter-->
    <parameter name="ServiceClass" locked="false">org.wso2.axis.service.impl.OrderServiceImpl</parameter>

    <!--common message receivers-->
    <messageReceivers>
        <messageReceiver mep="http://www.w3.org/2004/08/wsdl/in-only"
                         class="org.apache.axis2.rpc.receivers.RPCInOnlyMessageReceiver"/>
        <messageReceiver mep="http://www.w3.org/2004/08/wsdl/in-out"
                         class="org.apache.axis2.rpc.receivers.RPCMessageReceiver"/>
    </messageReceivers>

    <!--addOder operation-->
    <operation name="addOrder" namespace="http://service.axis.wso2.org">
        <actionMapping>urn:addOrder</actionMapping>
    </operation>

    <!--getOrderByOrderNumber operation-->
    <operation name="getOrderByOrderNumber" namespace="http://service.axis.wso2.org">
        <actionMapping>urn:getOrderByOrderNumber</actionMapping>
    </operation>

    <!--getAllOderDetails operation-->
    <operation name="getAllOderDetails" namespace="http://service.axis.wso2.org">
        <actionMapping>urn:getAllOderDetails</actionMapping>
    </operation>

</service>

Add following dependencies to pom.xml

        <dependency>
            <groupId>training.exercise</groupId>
            <artifactId>exercise-utils</artifactId>
            <version>1.0</version>
        </dependency>
        <dependency>
            <groupId>org.apache.axis2</groupId>
            <artifactId>axis2</artifactId>
            <version>1.6.1</version>
        </dependency>
        <dependency>
            <groupId>org.apache.axis2</groupId>
            <artifactId>axis2-adb</artifactId>
            <version>1.6.1</version>
        </dependency>
        <dependency>
            <groupId>org.apache.axis2</groupId>
            <artifactId>axis2-transport-http</artifactId>
            <version>1.6.1</version>
        </dependency>
        <dependency>
            <groupId>org.apache.axis2</groupId>
            <artifactId>axis2-transport-local</artifactId>
            <version>1.6.1</version>
        </dependency>
        <dependency>
            <groupId>org.apache.axis2</groupId>
            <artifactId>axis2-xmlbeans</artifactId>
            <version>1.6.1</version>
        </dependency>

Add axis2-aar-maven-plugin under <plugins></plugins>

<!--Axis Archive generate plugin-->
            <plugin>
                <groupId>org.apache.axis2</groupId>
                <artifactId>axis2-aar-maven-plugin</artifactId>
                <version>${axis2.version}</version>
                <configuration>
                    <aarName>OrderService</aarName>
                    <servicesXmlFile>${basedir}/src/main/resources/META-INF/services.xml</servicesXmlFile>
                    <includeDependencies>false</includeDependencies>
                </configuration>
                <executions>
                    <execution>
                        <phase>package</phase>
                        <goals>
                            <goal>aar</goal>
                        </goals>
                    </execution>
                </executions>
            </plugin>

So the next step is to create a client to test the service. This also can done with axis2-wsdl2code-maven-plugin easily. This will generate call back handler and service stub.

<!--Axis client generate plugin-->
            <plugin>
                <groupId>org.apache.axis2</groupId>
                <artifactId>axis2-wsdl2code-maven-plugin</artifactId>
                <version>${axis2.version}</version>
                <executions>
                    <execution>
                        <goals>
                            <goal>wsdl2code</goal>
                        </goals>
                        <configuration>
                            <wsdlFile>${basedir}/src/main/resources/wsdl/OrderService.wsdl</wsdlFile>
                            <databindingName>adb</databindingName>
                            <packageName>org.wso2.axis.stub</packageName>
                            <outputDirectory>${basedir}/src/main/java</outputDirectory>
                            <flattenFiles>true</flattenFiles>
                        </configuration>
                    </execution>
                </executions>
            </plugin>

/**
 * OrderServiceCallbackHandler Callback class, Users can extend this class and
 * implement
 * their own receiveResult and receiveError methods.
 */
public abstract class OrderServiceCallbackHandler {

/*
 * OrderServiceStub java implementation
 */
public class OrderServiceStub extends org.apache.axis2.client.Stub {

Using service stub directly is not a good practice. Therefore I wrote a wrapper class to call the stub methods. This makes directly call the service method and get the result.

/**
 * Wrapper class to call the {@see org.wso2.axis.stub.OrderServiceStub}
 */
public class OrderServiceClient {

    private static final Logger logger = LoggerFactory.getLogger(OrderServiceClient.class);
    private String endPoint;

    public OrderServiceClient(String endPoint) {
        this.endPoint = endPoint;
    }

    /**
     * call the addOrder web service method
     *
     * @param order {@see Order} object which contains data
     * @return result message
     */
    public String addOrder(Order order){
        String result = null;
        try {
            //instantiate OrderServiceStub
            OrderServiceStub orderServiceStub = getOrderServiceStub();
            //instantiate AddOrder
            OrderServiceStub.AddOrder addOrder = new OrderServiceStub.AddOrder();
            //instantiate Order
            OrderServiceStub.Order order1 = new OrderServiceStub.Order();
            //Marshalling data
            order1.setCustomerName(order.getCustomerName());
            order1.setOrderDate(order.getOrderDate());
            order1.setOrderNumber(order.getOrderNumber());
            addOrder.setOrder(order1);
            //call addOrder
            OrderServiceStub.AddOrderResponse addOrderResponse = orderServiceStub.addOrder(addOrder);
            result = addOrderResponse.get_return();
        } catch (AxisFault axisFault) {
            axisFault.printStackTrace();
            logger.error("Exception occurred in Service End Point", axisFault);
        } catch (RemoteException e) {
            e.printStackTrace();
            logger.error("Exception occurred in calling service", e);
        }
        return result;
    }

    /**
     * call the getOrderByOrderNumber web service method
     *
     * @param orderNumber order number of given order
     * @return {@see Order} object which contains data
     */
    public Order getOrderByOrderNumber(Integer orderNumber){
        Order order = new Order();
        try {
            //instantiate OrderServiceStub
            OrderServiceStub orderServiceStub = getOrderServiceStub();
            //instantiate GetOrderByOrderNumber
            OrderServiceStub.GetOrderByOrderNumber getOrderByOrderNumber = new OrderServiceStub.GetOrderByOrderNumber();
            //set order number
            getOrderByOrderNumber.setOrderNumber(orderNumber);
            //call getOrderByOrderNumber
            OrderServiceStub.GetOrderByOrderNumberResponse orderByOrderNumber =
                    orderServiceStub.getOrderByOrderNumber(getOrderByOrderNumber);
            OrderServiceStub.Order order1 = orderByOrderNumber.get_return();
            //Unmarshalling order
            order.setOrderNumber(order1.getOrderNumber());
            order.setOrderDate(order1.getOrderDate());
            order.setCustomerName(order1.getCustomerName());
        } catch (AxisFault axisFault) {
            logger.error("Exception occurred in Service End Point", axisFault);
        } catch (RemoteException e) {
            logger.error("Exception occurred in calling service", e);
        }
        return order;
    }

    /**
     * call the getAllOrderDetails web service method
     *
     * @return
     */
    public List<Order> getAllOderDetails() {
        List<Order> orderList = new ArrayList<Order>();
        try {
            //instantiate OrderServiceStub
            OrderServiceStub orderServiceStub = getOrderServiceStub();
            //instantiate GetAllOrderDetails
            OrderServiceStub.GetAllOderDetails getAllOderDetails = new OrderServiceStub.GetAllOderDetails();
            //call getAllOrderDetails
            OrderServiceStub.GetAllOderDetailsResponse allOderDetails =
                    orderServiceStub.getAllOderDetails(getAllOderDetails);
            //unmarshalling order
            OrderServiceStub.Order[] orders = allOderDetails.get_return();
   for (OrderServiceStub.Order order : orders) {
    Order order1 = new Order();
                order1.setOrderNumber(order.getOrderNumber());
                order1.setOrderDate(order.getOrderDate());
                order1.setCustomerName(order.getCustomerName());
                orderList.add(order1);
   }
        } catch (AxisFault axisFault) {
            axisFault.printStackTrace();
            logger.error("Exception occurred in Service End Point", axisFault);
        } catch (RemoteException e) {
            e.printStackTrace();
            logger.error("Exception occurred in calling service", e);
        }
        return orderList;
    }

    /**
     * OrderServiceStub factory method
     *
     * @return {@see OrderServiceStub} object
     * @throws AxisFault
     */
    private OrderServiceStub getOrderServiceStub() throws AxisFault {
        return new OrderServiceStub(endPoint);
    }
}
 
Then I wrote a test class to test the web service through client. But to do all these, the prerequisite is the service must be up and running. :) The problem is each and every time when I build the project service must be available otherwise test cases fails. :( I can skip the test case and build the project but it's not the proper way to do it.

/**
 * Test class for OrderServiceClient
 *
 */
public class OrderServiceClientTest {

    public static final String ORDER_SERVICE_END_POINT="http://as.wso2.org:9763/services/OrderService?wsdl";
    
 @Test
 public void testAddOrder() {
        OrderServiceClient orderServiceClient = getOrderServiceClient();
        Order order = createOrder(1, new Date(), "Indika Sampath");
        String result = orderServiceClient.addOrder(order);
        Assert.assertNotNull(result);
        System.out.println(result);
    }

    /**
     * OrderServiceClient factory method
     *
     * @return
     */
    private OrderServiceClient getOrderServiceClient() {
        return new OrderServiceClient(ORDER_SERVICE_END_POINT);
    }

    /**
     * Order factory method
     *
     * @param orderNumber
     * @param orderDate
     * @param customerName
     * @return
     */
 private Order createOrder(Integer orderNumber, Date orderDate, String customerName) {
  Order order = new Order();
  order.setOrderNumber(orderNumber);
  order.setOrderDate(orderDate);
  order.setCustomerName(customerName);
  return order;
 }

}

So what I want is find out is the way to dynamically create the axis2 service. Axis2 has rich set of features. I found that it's possible to programmatically  create and deploy the service by providing the service class.

/**
 * Test class for OrderServiceClient
 *
 */
public class OrderServiceClientTest implements ServiceObjectSupplier {

    private OrderService orderService = new OrderServiceImpl();
    private static int port = RemoteUtil.findFreePort();
    private AxisServer server = new AxisServer();

    @BeforeClass(alwaysRun = true)
    public void setUp() throws Exception {
        setupAxisServer(OrderService.class.getName(), OrderServiceClientTest.class.getName());
    }

    @AfterClass
    public void tearDown() throws Exception {
        server.stop();
    }

 @Test
 public void testAddOrder() {
        OrderServiceClient orderServiceClient = getOrderServiceClient();
        Order order = createOrder(1, new Date(), "Indika Sampath");
        String result = orderServiceClient.addOrder(order);
        Assert.assertNotNull(result);
        System.out.println(result);
    }

    /**
     * OrderServiceClient factory method
     *
     * @return
     */
    private OrderServiceClient getOrderServiceClient() {
        return new OrderServiceClient("http://localhost:" + port +
                "/axis2/services/OrderService");
    }

    /**
     * Order factory method
     *
     * @param orderNumber
     * @param orderDate
     * @param customerName
     * @return
     */
 private Order createOrder(Integer orderNumber, Date orderDate, String customerName) {
  Order order = new Order();
  order.setOrderNumber(orderNumber);
  order.setOrderDate(orderDate);
  order.setCustomerName(customerName);
  return order;
 }

    /**
     * Setup and start Axis-Server.
     *
     * @param serviceClassName
     * @throws org.apache.axis2.AxisFault
     */
    private void setupAxisServer(String serviceClassName, String serviceObjectSupplierClassName)
            throws AxisFault,
            IllegalAccessException,
            InstantiationException {
        // Setup the custom port
        Map<String, TransportInDescription> transports =
                server.getConfigurationContext()
                        .getAxisConfiguration()
                        .getTransportsIn();
        for (Map.Entry<String, TransportInDescription> objectEntry : transports.entrySet()) {
            TransportInDescription desc = objectEntry.getValue();
            Parameter param = desc.getParameter("port");
            param.setValue(Integer.toString(port));
        }
        server.getConfigurationContext().getAxisConfiguration()
                .addParameter(Constants.SERVICE_OBJECT_SUPPLIER, serviceObjectSupplierClassName);
        //deploy OrderService
        server.deployService(serviceClassName);
    }

    /**
     * Callback-Method to retrieve the Service
     *
     * @param theService
     * @return Object
     */
    public Object getServiceObject(AxisService theService) {
        String service = theService.getName();
        if (service.equals("OrderService")) {
            return orderService;
        }
        return null;
    }
}

Note that I have to do some changes in generated stub (OrderServiceStub) to execute test due to namespace issue with programmatically deploy service. You can write a client inside the test method and test the service method. :)

@Test
    public void testGetOrderByOrderNumber() throws AxisFault {
  RPCServiceClient serviceClient = getRpcServiceClient();
  QName operationName = new QName("http://service.axis.wso2.org", "addOrder");
  Order order = createOrder(1, new Date(), "Indika Sampath");
  Object[] operationArguments = new Object[] { order };
  Class[] returnTypes = new Class[] { String.class };
  Object[] response =
                      serviceClient.invokeBlocking(operationName, operationArguments,
                                                   returnTypes);
  String result = (String) response[0];
  Assert.assertNotNull(result);
  System.out.println(result);

        /*OrderServiceClient orderServiceClient = getOrderServiceClient();
        Order order = createOrder(1, new Date(), "Indika Sampath");
        String result = orderServiceClient.addOrder(order);
        Assert.assertNotNull(result);
        System.out.println(result);*/
    }

    /**
     * Axis2 Client stuff
     *
     * @return
     * @throws org.apache.axis2.AxisFault
     */
    private RPCServiceClient getRpcServiceClient() throws AxisFault {
        RPCServiceClient serviceClient = new RPCServiceClient();
        Options options = serviceClient.getOptions();
        EndpointReference targetEPR =
                new EndpointReference("http://localhost:" + port +
                        "/axis2/services/OrderService");
        options.setTo(targetEPR);
        return serviceClient;
    }

You don't need to use mockup framework for testing. You can easily test your web services as they real time deploy in the server. :)

Sunday, December 15, 2013

How to add Criterion to @OneToMany mapping in Hibernate

Hi All,

Yesterday I faced a problem with load some data based on the Criterion which I wrote to @OneToMany mapping. I Google all over the day but I couldn't come up with a proper solution. Finally I found an answer by my self. I thought of sharing with you in my blog.

Here is the problem explanation. Result which I want to get mapped with couple of Hibernate model classes but here I take 3 classes which is basically involve in add Criterion to the @OneToMany mapping.

One Assessment can have many Property and one Property can have many PropertyOwner.

Code snippet of model classes  as below. (These are not the complete model classes)

Assessment.java
@Entity
@FilterDef(name = "tenantFilter", parameters = @ParamDef(name = "tenantIdParam", type = "string"))
@Filters(@Filter(name = "tenantFilter", condition = "tenant_id = :tenantIdParam"))
@Table(name = "assessment")
public class Assessment implements Serializable {

 @Id
 @Column(name = "id")
 @GeneratedValue(strategy = GenerationType.AUTO)
 private Long id;
 @ManyToOne(fetch = FetchType.LAZY)
 @Cascade(value = org.hibernate.annotations.CascadeType.ALL)
 @JoinColumn(name = "property_id")
 private Property propertyAssessment;
 @ManyToOne(fetch = FetchType.LAZY)
 @JoinColumn(name = "elg_activity_id", nullable = false)
 private ElgActivity elgActivity;
 @Column(name = "tenant_id", nullable = false)
 private String tenantId;
 // other attributes
 // getters and setters
} 

Property.java
@Entity
@FilterDef(name = "tenantFilter", parameters = @ParamDef(name = "tenantIdParam", type = "string"))
@Filters(@Filter(name = "tenantFilter", condition = "tenant_id = :tenantIdParam"))
@Table(name = "property")
public class Property implements Serializable {

 @Id
 @GeneratedValue(strategy = GenerationType.AUTO)
 @Column(name = "id", unique = true, nullable = false)
 private Long id;
 @OneToMany(fetch = FetchType.LAZY, mappedBy = "propertyAssessment")
 @Cascade(value = CascadeType.ALL)
 private List<assessment> assessments = new ArrayList<assessment>(0);
 @OneToMany(fetch = FetchType.LAZY, mappedBy = "property")
 @Cascade(value = CascadeType.ALL)
 @LazyCollection(LazyCollectionOption.FALSE)
 private List<propertyowner> propertyOwners = new ArrayList<propertyowner>(0);
 @Column(name = "tenant_id", nullable = false)
 private String tenantId;
 // other attributes
 // getters and setters
}

PropertyOwner.java
@Entity
@FilterDef(name = "tenantFilter", parameters = @ParamDef(name = "tenantIdParam", type = "string"))
@Filters(@Filter(name = "tenantFilter", condition = "tenant_id = :tenantIdParam"))
@Table(name = "property_owner")
public class PropertyOwner implements Serializable {

 @Id
 @GeneratedValue(strategy = GenerationType.AUTO)
 @Column(name = "id", unique = true, nullable = false)
 private Long id;
 @OneToOne(fetch = FetchType.EAGER)
 @Cascade(value = CascadeType.ALL)
 @JoinColumn(name = "person_id")
 private Person person;
 @ManyToOne(fetch = FetchType.LAZY)
 @Cascade(value = CascadeType.ALL)
 @JoinColumn(name = "property_id")
 private Property property = new Property();
 @Column(name = "status")
 private String status;
 @Column(name = "tenant_id", nullable = false)
 private String tenantId;
 // other attributes
 // getters and setters
}

My query is to get the PropertyOwner by their status. PropertyOwner status can be either ACTIVE or INACTIVE. My requirement is to get all the ACTIVE PropertyOwner. Here is the method I wrote to get the result.

@Override
public Assessment getAssessmentById(Long assessmentId, Object tenantId) throws HibernateException {
Session session = getSession(tenantId);
Assessment result = (Assessment) session.createCriteria(Assessment.class)
.createAlias("propertyAssessment", "propertyAssessment")
.createAlias("propertyAssessment.propertyOwners", "propertyOwner", JoinType.LEFT_OUTER_JOIN)
.add(Restrictions.eq("id", assessmentId))
.add(Restrictions.ne("propertyOwner.status", ScandiumKeyBox.INACTIVE))
.uniqueResult();
return result;
}

The tricky point here is the JoinType.LEFT_OUTER_JOIN. By default if you wrote a createAlias and lazy load object then default JoinType would be JoinType.INNER_JOIN. This will load all matching objects regardless of your Criterion to that object. Here I overcome that problem with LEFT_OUTER_JOIN. Other thing is here I load the exact result by matching the id (primary key).

If you want to load list of objects, make sure to set below line to the criteria.
.setResultTransformer(Criteria.DISTINCT_ROOT_ENTITY) 

Hope this would be helpful you to get the exact result in @OneToMany mapping by adding Criterion.

Thank you.