Friday, August 7, 2015

Jmeter publisher subscriber for ActiveMQ AMQP protocol

Recently I was assigned task to evaluate performance of ActiveMQ AMQP protocol [1]. ActiveMQ supports AMQP v1.0 specification and it is completely different from previous versions of AMQP specification (0.10, 0.9.1, 0.9 ..). AMQP v1.0 support added to ActiveMQ  by Apache Qpid Proton. Let's see how we can connected to ActiveMQ broker with Jmeter.

Start ActiveMQ broker. Please note that AMQP supports added to ActiveMQ version 5.8 onward. I had apache-activemq-5.10.0 distribution.

Go to bin folder and start broker by executing activemq shell script.
~/apache-activemq-5.10.0/bin$ ./activemq start

This would start broker in background and you can see logs by tail log file.
~/apache-activemq-5.10.0/data$ tailf activemq.log

AMQP listening in 5672 port by default. You can change default AMQP port by editing AMQP transportConnector in activemq.xml.
<transportConnector name="amqp" uri="amqp://0.0.0.0:5672?maximumConnections=1000&amp;wireFormat.maxFrameSize=104857600"/>

Now we'll go through how to create Jmeter script. I am using apache-jmeter-2.7. You need to copy following jar files to lib folder of Jmeter. 

activemq-all-5.10.0.jar
geronimo-jms_1.1_spec-1.1.1.jar
qpid-amqp-1-0-client-0.26.jar
qpid-amqp-1-0-client-jms-0.26.jar
qpid-amqp-1-0-common-0.26.jar

Above libraries would provide necessary classes to execute test plan in Jmeter.

Next we need to create a property file which contain jndi names to register AMQP connection factories, queue/topic names. I created file called qpid.properties in apache-jmeter-2.7 folder and added following entries.
# register some connection factories
# connectionfactory.[jndiname] = [ConnectionURL - amqp://username:password@host:port]
connectionfactory.QueueConnectionFactory = amqp://admin:password@localhost:5672
connectionfactory.TopicConnectionFactory = amqp://admin:password@localhost:5672

# register some queues in JNDI using the form
# queue.[jndiName] = [physicalName]
queue.myQueue = myQueue

# register some topics in JNDI using the form
# topic.[jndiName] = [physicalName]
topic.myTopic = myTopic

If you have already worked with previous version of AMQP protocol, you may realize that broker url is completely different. There are no Virtual-hosts, Exchanges, Bindings according to AMQP v1.0. Therefore broker url also changed according to that. 

Now start Jmeter by executing jmeter.sh in bin folder.
~/apache-jmeter-2.7/bin$ ./jmeter.sh

Let's create test plan for subscriber. R-click Test Plan -> Add -> Thread (Users) -> Thread Group. I set name to Thread Group as Subscriber and Loop Count to 100.

amqp subscriber thread group

R-click Thread Group (Subscriber) -> Add -> Sampler -> JMS Subscriber. Set following properties.
Initial Context Factory - org.apache.qpid.amqp_1_0.jms.jndi.PropertiesFileInitialContextFactory
Provider URL - /home/indika/demo-zone/apache-jmeter-2.7/qpid.properties
Connection Factory - QueueConnectionFactory
Destination - myQueue

Make sure you provide same jndiName specified above for Connection Factory and Destination.

amqp subscriber

Let's add Summary Report to view result. R-click Thread Group (Subscriber) -> Add -> Listener -> Summary Report

amqp subscriber summary report

Now we'll create test plan for publisher. Start another instance of Jmeter by executing jmeter.sh in bin folder.
~/apache-jmeter-2.7/bin$ ./jmeter.sh

R-click Test Plan -> Add -> Thread (Users) -> Thread Group. I set name to Thread Group as Publisher and Loop Count to 100.

amqp publisher thread group

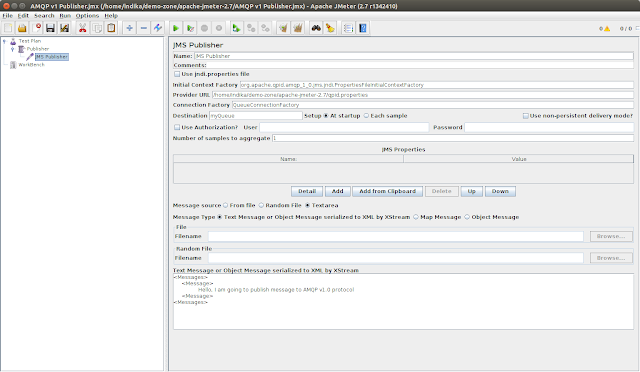
R-click Thread Group (Publisher) -> Add -> Sampler -> JMS Publisher. Set following properties.
Initial Context Factory - org.apache.qpid.amqp_1_0.jms.jndi.PropertiesFileInitialContextFactory
Provider URL - /home/indika/demo-zone/apache-jmeter-2.7/qpid.properties
Connection Factory - QueueConnectionFactory
Destination - myQueue

Set any message to publish in given text area.

amqp publisher


Let's add Summary Report to view result. R-click Thread Group (Publisher) -> Add -> Listener -> Summary Report

amqp publisher summary report

Now you can execute both test plans. First start subscriber test plan by pressing start button in Jmeter. Next start publisher test plan. You could see the result of both in summary report.


[1] http://activemq.apache.org/amqp.html
[2] http://qpid.apache.org/proton

Saturday, May 2, 2015

Shared Topic Subscription in WSO2 Message Broker 3.0.0

This post mainly focus on how configure shared topic subscription in WSO2 MB 3.0.0 and discuss use case with WSO2 ESB cluster as JMS consumer and publisher.

Enable shared topic subscription

  1. Extract wso2mb-3.0.0-SNAPSHOT zip archive
  2. Configure it with preferable message store (ex: MySQL, MSSQL, Oracle, Cassandra) - By default it’s distribute with H2. You can play with default message store. But we do not recommend it for clustering and production setup. [1]
  3. Open wso2mb-3.0.0/repository/conf/broker.xml
  4. Set <allowSharedTopicSubscriptions> to true under <amqp enabled="true"> in <transports>.

Now you’ll be able to add multiple durable subscription with same subscription id. Please refer how to write JMS client samples [2].

How shared topic subscription works?

mb_3_0_0_shared_subscription.png


  1. Subscriber 1 create durable subscription to myDurableTopic with id : subId-x
  2. Subscriber 2 create durable subscription to myDurableTopic with id : subId-x
  3. Subscriber 3 create durable subscription to myDurableTopic with id : subid-y
  4. Publisher send messages to myDurableTopic
  5. Message delivery as below among durable subscribers:
    1. Subscriber 1 and Subscriber 2 with id : subId-x get copy of each message in round robin order
    2. Subscriber 3 with id : subId-y get each copy of each message

Rationale of message delivery of shared subscription is, If there are multiple subscribers with same subscription id for particular durable topic, then message delivered among them in round robin order.

Use Case - WSO2 MB shared subscription with WSO2 ESB cluster

mb_3_0_0_shared_subscription_use_case_ESB.png


Setting up WSO2 MB 3.0.0

Default H2 based message store use as it is.
Shared subscription enabled in wso2mb-3.0.0-SNAPSHOT/repository/conf/broker.xml as below

        <amqp enabled="true">
            <!-- most of the AMQP configurations reside in qpid-config.xml since we inherit the Qpid
            messaging model during AMQP.-->
            <port>5672</port>
            <sslPort>8672</sslPort>
            <sendExpiredMessagesToDLC>false</sendExpiredMessagesToDLC>
            <maximumRedeliveryAttempts>10</maximumRedeliveryAttempts>
            <allowSharedTopicSubscriptions>true</allowSharedTopicSubscriptions>
        </amqp>

Go to wso2mb-3.0.0-SNAPSHOT/bin and start broker wso2server.sh start
You can tail logs in wso2mb-3.0.0-SNAPSHOT/repository/logs/wso2carbon.log

Setting up backend server - SimpleStockQuoteService

Go to wso2esb-4.8.1/samples/axis2Server/src/SimpleStockQuoteService
Run ant command and it will build SimpleStockQuoteService axis2 service
Start SimpleStockQuoteService:
  • Go to wso2esb-4.8.1/samples/axis2Server/ and run ./axis2server.sh

Setting up WSO2 ESB 4.8.1

This guide shows you to setting up one ESB node. Please refer [3] to configure ESB cluster.
Offset changed to 1 in wso2esb-4.8.1/repository/conf/carbon.xml

        <!-- Ports offset. This entry will set the value of the ports defined below to
         the define value + Offset.
         e.g. Offset=2 and HTTPS port=9443 will set the effective HTTPS port to 9445
         -->
        <Offset>1</Offset>

JMS transport enabled in wso2esb-4.8.1/repository/conf/axis2/axis2.xml as below

    <!--Uncomment this and configure as appropriate for JMS transport support with WSO2 MB 2.x.x -->
    <transportReceiver name="jms" class="org.apache.axis2.transport.jms.JMSListener">
        <parameter name="myTopicConnectionFactory" locked="false">
           <parameter name="java.naming.factory.initial" locked="false">org.wso2.andes.jndi.PropertiesFileInitialContextFactory</parameter>
            <parameter name="java.naming.provider.url" locked="false">repository/conf/jndi.properties</parameter>
            <parameter name="transport.jms.ConnectionFactoryJNDIName" locked="false">TopicConnectionFactory</parameter>
            <parameter name="transport.jms.ConnectionFactoryType" locked="false">topic</parameter>
        </parameter>

        <parameter name="myQueueConnectionFactory" locked="false">
            <parameter name="java.naming.factory.initial" locked="false">org.wso2.andes.jndi.PropertiesFileInitialContextFactory</parameter>
            <parameter name="java.naming.provider.url" locked="false">repository/conf/jndi.properties</parameter>
            <parameter name="transport.jms.ConnectionFactoryJNDIName" locked="false">QueueConnectionFactory</parameter>
           <parameter name="transport.jms.ConnectionFactoryType" locked="false">queue</parameter>
        </parameter>

        <parameter name="default" locked="false">
            <parameter name="java.naming.factory.initial" locked="false">org.wso2.andes.jndi.PropertiesFileInitialContextFactory</parameter>
            <parameter name="java.naming.provider.url" locked="false">repository/conf/jndi.properties</parameter>
            <parameter name="transport.jms.ConnectionFactoryJNDIName" locked="false">QueueConnectionFactory</parameter>
            <parameter name="transport.jms.ConnectionFactoryType" locked="false">queue</parameter>
        </parameter>
    </transportReceiver>

   <!-- uncomment this and configure to use connection pools for sending messages-->
     <transportSender name="jms" class="org.apache.axis2.transport.jms.JMSSender"/>

JNDI.properties configured to connection lookup in wso2esb-4.8.1/repository/conf/jndi.properties

# register some connection factories
# connectionfactory.[jndiname] = [ConnectionURL]
connectionfactory.QueueConnectionFactory = amqp://admin:admin@clientID/carbon?brokerlist='tcp://localhost:5672'
connectionfactory.TopicConnectionFactory = amqp://admin:admin@clientID/carbon?brokerlist='tcp://localhost:5672'

Copy below client libraries from wso2mb-3.0.0-SNAPSHOT/client-lib/ to wso2esb-4.8.1/repository/components/lib

andes-client-3.0.0-SNAPSHOT.jar
geronimo-jms_1.1_spec-1.1.0.wso2v1.jar

Go to wso2esb-4.8.1/bin and start service bus wso2server.sh start
You can tail logs in wso2esb-4.8.1/repository/logs/wso2carbon.log


JMS consumer and publisher proxies

Login to ESB management console and create proxy services as below:

StockDataPersistProxy

<proxy xmlns="http://ws.apache.org/ns/synapse"
      name="StockDataPersistProxy"
      transports="http"
      statistics="disable"
      trace="disable"
      startOnLoad="true">
  <target>
     <inSequence>
        <property name="OUT_ONLY" value="true"/>
        <property name="FORCE_SC_ACCEPTED" value="true" scope="axis2"/>
        <log level="custom">
           <property name="STATE" value="Stock data publishing..."/>
        </log>
        <send>
           <endpoint>
              <address uri="jms:/stockDataTopic?&amp;java.naming.factory.initial=org.wso2.andes.jndi.PropertiesFileInitialContextFactory&amp;java.naming.provider.url=repository/conf/jndi.properties&amp;transport.jms.ConnectionFactoryJNDIName=TopicConnectionFactory&amp;transport.jms.DestinationType=topic"/>
           </endpoint>
        </send>
     </inSequence>
     <outSequence/>
  </target>
  <description/>
</proxy>


StockDataDeliveryProxy

<?xml version="1.0" encoding="UTF-8"?>
<proxy xmlns="http://ws.apache.org/ns/synapse"
      name="StockDataDeliveryProxy"
      transports="jms"
      statistics="disable"
      trace="disable"
      startOnLoad="true">
  <target>
     <inSequence>
        <property name="OUT_ONLY" value="true"/>
        <log level="custom">
           <property name="STATE" value="Stock data delivering..."/>
        </log>
        <send>
           <endpoint>
              <address uri="http://localhost:9000/services/SimpleStockQuoteService"/>
           </endpoint>
        </send>
     </inSequence>
     <outSequence>
        <send/>
     </outSequence>
  </target>
  <parameter name="transport.jms.ContentType">
     <rules>
        <jmsProperty>contentType</jmsProperty>
        <default>text/xml</default>
     </rules>
  </parameter>
  <parameter name="transport.jms.ConnectionFactory">myTopicConnectionFactory</parameter>
  <parameter name="transport.jms.DestinationType">topic</parameter>
  <parameter name="transport.jms.SubscriptionDurable">true</parameter>
  <parameter name="transport.jms.Destination">stockDataTopic</parameter>
  <parameter name="transport.jms.DurableSubscriberName">subId-x</parameter>
  <parameter name="transport.jms.CacheLevel">consumer</parameter>
  <parameter name="transport.jms.DurableSubscriberClientID">subId-x</parameter>
  <description/>
</proxy>

Test the setup

SoapUI used to call stockDataPersistProxy and send request to SimpleStockQuoteService

Open SoapUI and create New SOAP Project with WSDL URL of StockDataPersistProxy.
Call StockDataPersistProxy with below SOAP envelop and you can monitor logs in wso2esb console and axis2 servers.

<soapenv:Envelope xmlns:soapenv="http://schemas.xmlsoap.org/soap/envelope/" xmlns:ser="http://services.samples">
  <soapenv:Header/>
  <soapenv:Body>
     <ser:getSimpleQuote>
        <ser:symbol>IBM</ser:symbol>
     </ser:getSimpleQuote>
  </soapenv:Body>
</soapenv:Envelope>


Thursday, January 8, 2015

Where is your java distribution running on Ubuntu ?

There are couple of ways to getting Java running on Ubuntu. Some are extract the Java binary distribution and changing system files to thing get effected. Some are using apt-get install utility to Java distribution get running on Ubuntu. So in this blog post I am not going to discuss about how to get Java running on Ubuntu. 

You may actually not know where is Java distribution folder extracted and running, I mean which path if you installed it using apt-get utility. Even you may forget with the time being, specially like me ;-) if you extracted Java binary in a exact path that you want. I faced same situation and need to find out where is my Java distribution running. So I found the below command which exactly tell you the path.


readlink -f $(which java)