Recently I was assigned task to evaluate performance of ActiveMQ AMQP protocol [1]. ActiveMQ supports AMQP v1.0 specification and it is completely different from previous versions of AMQP specification (0.10, 0.9.1, 0.9 ..). AMQP v1.0 support added to ActiveMQ by Apache Qpid Proton. Let's see how we can connected to ActiveMQ broker with Jmeter.
Start ActiveMQ broker. Please note that AMQP supports added to ActiveMQ version 5.8 onward. I had apache-activemq-5.10.0 distribution.
Go to bin folder and start broker by executing activemq shell script.
~/apache-activemq-5.10.0/bin$ ./activemq start
This would start broker in background and you can see logs by tail log file.
~/apache-activemq-5.10.0/data$ tailf activemq.log
AMQP listening in 5672 port by default. You can change default AMQP port by editing AMQP transportConnector in activemq.xml.
<transportConnector name="amqp" uri="amqp://0.0.0.0:5672?maximumConnections=1000&wireFormat.maxFrameSize=104857600"/>
Now we'll go through how to create Jmeter script. I am using apache-jmeter-2.7. You need to copy following jar files to lib folder of Jmeter.
activemq-all-5.10.0.jar
geronimo-jms_1.1_spec-1.1.1.jar
qpid-amqp-1-0-client-0.26.jar
qpid-amqp-1-0-client-jms-0.26.jar
qpid-amqp-1-0-common-0.26.jar
Above libraries would provide necessary classes to execute test plan in Jmeter.
Next we need to create a property file which contain jndi names to register AMQP connection factories, queue/topic names. I created file called qpid.properties in apache-jmeter-2.7 folder and added following entries.
# register some connection factories
# connectionfactory.[jndiname] = [ConnectionURL - amqp://username:password@host:port]
connectionfactory.QueueConnectionFactory = amqp://admin:password@localhost:5672
connectionfactory.TopicConnectionFactory = amqp://admin:password@localhost:5672

# register some queues in JNDI using the form
# queue.[jndiName] = [physicalName]
queue.myQueue = myQueue

# register some topics in JNDI using the form
# topic.[jndiName] = [physicalName]
topic.myTopic = myTopic
If you have already worked with previous version of AMQP protocol, you may realize that broker url is completely different. There are no Virtual-hosts, Exchanges, Bindings according to AMQP v1.0. Therefore broker url also changed according to that.
Now start Jmeter by executing jmeter.sh in bin folder.
~/apache-jmeter-2.7/bin$ ./jmeter.sh
Let's create test plan for subscriber. R-click Test Plan -> Add -> Thread (Users) -> Thread Group. I set name to Thread Group as Subscriber and Loop Count to 100.
R-click Thread Group (Subscriber) -> Add -> Sampler -> JMS Subscriber. Set following properties.
Initial Context Factory - org.apache.qpid.amqp_1_0.jms.jndi.PropertiesFileInitialContextFactory
Provider URL - /home/indika/demo-zone/apache-jmeter-2.7/qpid.properties
Connection Factory - QueueConnectionFactory
Destination - myQueue
Make sure you provide same jndiName specified above for Connection Factory and Destination.
Let's add Summary Report to view result. R-click Thread Group (Subscriber) -> Add -> Listener -> Summary Report
Now we'll create test plan for publisher. Start another instance of Jmeter by executing jmeter.sh in bin folder.
R-click Test Plan -> Add -> Thread (Users) -> Thread Group. I set name to Thread Group as Publisher and Loop Count to 100.
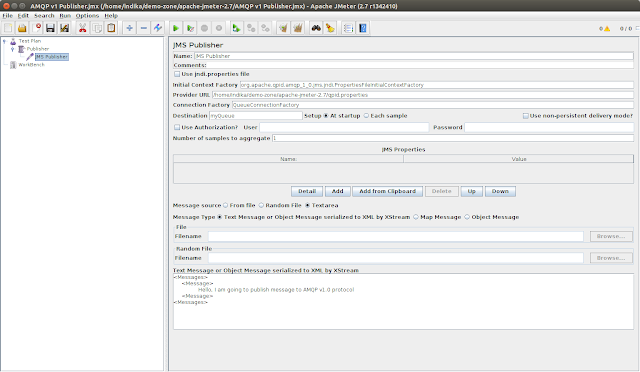
R-click Thread Group (Publisher) -> Add -> Sampler -> JMS Publisher. Set following properties.
Set any message to publish in given text area.
Let's add Summary Report to view result. R-click Thread Group (Publisher) -> Add -> Listener -> Summary Report
Now you can execute both test plans. First start subscriber test plan by pressing start button in Jmeter. Next start publisher test plan. You could see the result of both in summary report.
[1] http://activemq.apache.org/amqp.html
[2] http://qpid.apache.org/proton
~/apache-jmeter-2.7/bin$ ./jmeter.sh
R-click Test Plan -> Add -> Thread (Users) -> Thread Group. I set name to Thread Group as Publisher and Loop Count to 100.
R-click Thread Group (Publisher) -> Add -> Sampler -> JMS Publisher. Set following properties.
Initial Context Factory - org.apache.qpid.amqp_1_0.jms.jndi.PropertiesFileInitialContextFactory
Provider URL - /home/indika/demo-zone/apache-jmeter-2.7/qpid.properties
Connection Factory - QueueConnectionFactory
Destination - myQueue
Set any message to publish in given text area.
Let's add Summary Report to view result. R-click Thread Group (Publisher) -> Add -> Listener -> Summary Report
Now you can execute both test plans. First start subscriber test plan by pressing start button in Jmeter. Next start publisher test plan. You could see the result of both in summary report.
[1] http://activemq.apache.org/amqp.html
[2] http://qpid.apache.org/proton


